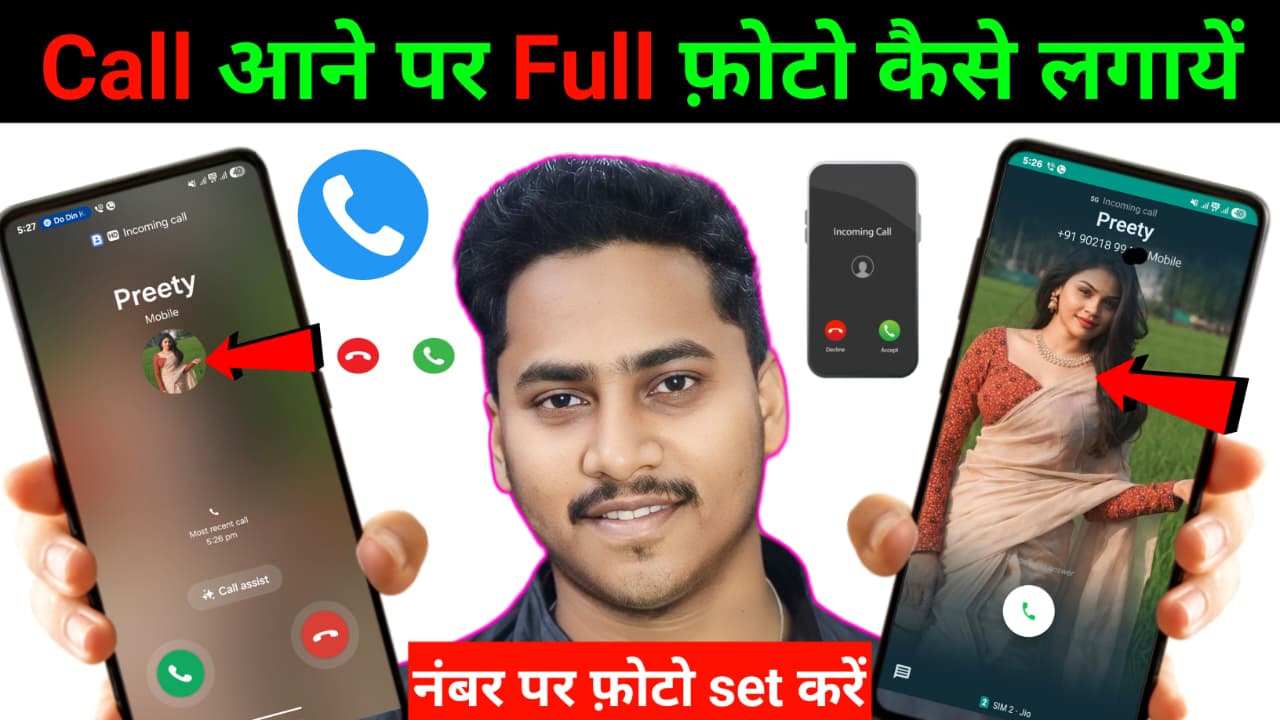
How to set Full photo when someone calling by True phone App
How to set full screen photo for incoming calls using the True Phone Dialer app is a great way to personalize your calling experience. It not only makes it easier to identify who’s calling at a glance but also adds a visual appeal to your phone interface. This guide will walk you through how to set a full photo for contacts in True Phone Dialer, why it’s useful, and what to do if you run into issues. We’ll aim for a clear, detailed explanation suitable for both beginners and experienced users.
What Is True Phone Dialer?
True Phone Dialer is a popular third-party dialer app available for Android devices. It replaces your default phone and contacts app, offering a more customizable and user-friendly interface. It includes features such as:
- Dual SIM support
- Smart contacts manager
- T9 dialing
- Call recording
- Full-screen caller ID with photo support
One of its standout features is the ability to display full-screen contact photos during incoming or outgoing calls.
Why Set Full Photos for Incoming Calls?
- Visual recognition: It’s easier to recognize a person visually rather than reading their name.
- Aesthetics: It gives your phone a modern and clean look.
- Personalization: It makes your phone feel more uniquely yours.
- Accessibility: Helps those with visual impairments or reading difficulties.
How to Set Full Photo in True Phone App
Here’s a step-by-step process to set a full photo for your contacts using the True Phone Dialer app:
Step 1: Install and Set True Phone as Default
- Download the App:
- Go to the Google Play Store.
- Search for True Phone Dialer & Contacts.
- Install the app.
- Set as Default Dialer:
- After installation, open the app.
- It will prompt you to set it as your default Phone app.
- Confirm the permission.
Step 2: Grant Necessary Permissions
To display full-screen photos, the app needs access to:
- Contacts
- Phone
- Storage (for accessing images)
When prompted, allow these permissions. If you skipped this step earlier:
- Go to Settings > Apps > True Phone > Permissions
- Enable Contacts, Phone, and Storage
Step 3: Add or Edit a Contact Photo
You need to assign a high-quality image to the contact. Here’s how:
- Open the True Phone App
- Go to the Contacts tab.
- Tap on the contact you want to edit.
- Tap the Edit (✎) icon or three-dot menu > Edit.
- Tap on the photo circle at the top.
- Choose:
- Take a Photo with camera
- Choose from Gallery to select an image
- Select or capture the image.
- Crop the image to full-face size.
- Try not to crop too tightly.
- Use a high-resolution photo (preferably over 720×1280 pixels) to ensure it fills the screen.
- Tap Save.
Step 4: Enable Full-Screen Photo Display
- Open True Phone Dialer.
- Go to Settings (gear icon or from the three-dot menu).
- Navigate to Call Interface or Call Screen.
- Look for an option like “Use Full-Screen Photos” or “Caller ID Style”.
- Enable Full-Screen Photo.
You can often choose between options like:
- Classic photo (small circle)
- Full-screen photo
- Modern UI with blurred background
Choose Full-screen photo or Fullscreen caller photo.
Step 5: Test the Setup
Have a friend call you or call yourself using another phone to see if the full photo appears. If it doesn’t:
- Check if the contact you’re calling is saved in your phone’s internal storage (not just on SIM or cloud).
- Make sure the image is linked to the right contact.
- Restart your phone and try again.
🛠 Troubleshooting Tips
Photo not showing full-screen?
Here are a few fixes to try:
- Use a larger image size.
- Delete and re-add the contact photo.
- Clear True Phone cache:
Settings > Apps > True Phone > Storage > Clear Cache - Check if the contact is duplicated. Only the primary contact will show the photo.
- Ensure you are not using another caller ID app (like Google Phone or Truecaller) that may override this setting.
🎨 Best Practices for Contact Photos
To make your contact photos look great in full screen:
- Use portrait-oriented photos.
- Avoid group photos or wide shots.
- Use a clean, high-contrast background.
- Center the face or main subject.
- Save the image at a good resolution (e.g., 1080×1920 pixels for full clarity).
🔄 Sync Photos Across Devices (Optional)
If you use Google Contacts, you can upload the photo directly to your contact in your Google account using a computer:
- Visit Google Contacts
- Find and edit the contact
- Add a high-resolution photo
- It will sync to your Android phone (make sure sync is on)
True Phone can display synced contact photos too.
App Download Link – 